A new version of this guide is available
You are viewing a guide written for an earlier ORF version. To view the latest version, click Other Versions below and select the latest version.
This guide provides step-by-step instructions for installing ORF 5.3 Fusion or Fusion for SBS.
Preparations
This guide covers only the basics of preparing for introducing ORF to your network. Consult the Deployment Guide for more complete recommendations.
Choosing the installation location in your network
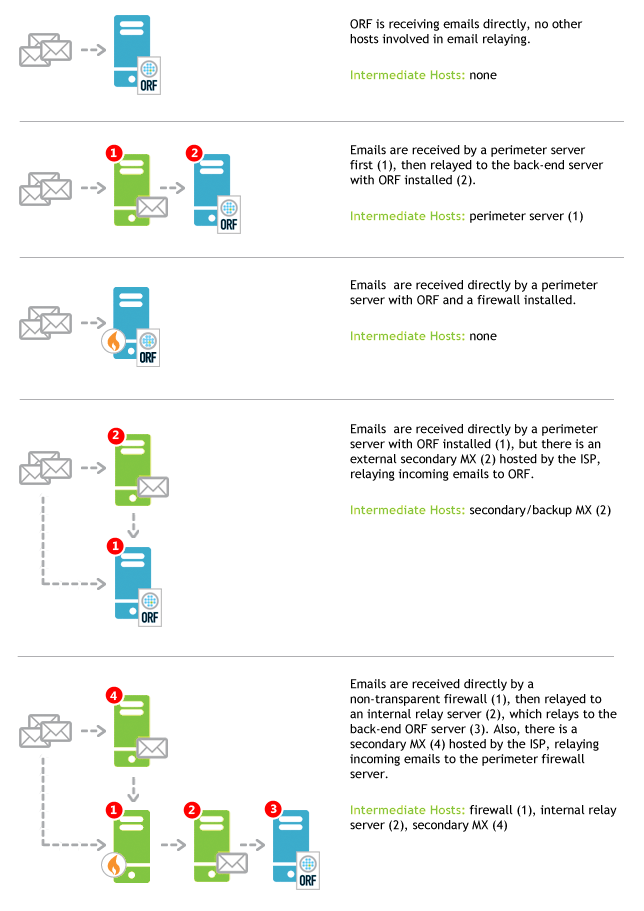
ORF is best deployed on the network perimeter, on your primary mail exchanger servers (primary MX) and optionally on all of the secondary MXs. Other locations within your network will work, but there are trade-offs with such locations.
-
With Microsoft® Exchange 2013
Install ORF on the server with Edge Transport role, introduced in Exchange 2013 SP1. Note that SP1 was shipped with a defect which should be addressed first by installing a hotfix. If you do not use edge servers, install on the server having both the Client Access and Mailbox server roles. If these roles are installed on separate servers, install ORF on both servers in order to use all ORF features.
Installing ORF on a Client Access server or a Mailbox server alone will work as well, but not all features will be available.
See the related Knowledge Base article and our Multi-Server Usage Guide for more information.
-
With Microsoft® Exchange 2010 or 2007
Install ORF on the server with Edge Transport role. If you do not use edge servers, install on the Hub Transport role server.
Installing ORF on a Hub Transport role server in an Edge Transport-Hub Transport setup will work as well (with trade-offs).
-
With Microsoft® Exchange 2003, Exchange 2000 and IIS
When possible, install ORF on the network perimeter servers.
ORF will also work behind front-end servers (such as SMTP front-ends, non-transparent firewalls, anti-virus proxies or cloud email filtering services) with trade-offs.
Preparing for service outages
Under Microsoft® Exchange 2013, 2010 and 2007, the ORF setup restarts the transport service(s) of Exchange to finalize the installation. Depending on your Exchange version and setup, this could be the MSExchangeTransport service (Exchange 2010 and 2007, Exchange 2013 Edge and Mailbox server roles), the MSExchangeFrontEndTransport (Exchange 2013 Client Access server role) or both (Exchange 2013 Client Access server and Mailbox roles on the same server). SMTP email transmission will be down while these services are restarting. This usually takes less than a minute (differences may occur). It is recommended to schedule the installation to a time when the service outage causes the least problems.
There is no service outage under Microsoft® Exchange 2003, Exchange 2000 and IIS SMTP.
The installation process itself usually takes just a couple of minutes.
Installation
Starting the installation
Make sure that you are logged in as administrator. Run the ORF Setup binary.
The installation process
The installation is guided by the ORF Setup program. No special configuration is required at this point, the Setup asks for the usual installation parameters, such as the program directory and menu shortcut creation.
Completing the Installation
At this point, ORF is installed and emails are again flowing through your server. However, ORF is not ready for filtering them yet. Follow the instructions below to complete the set up of ORF for your network. Do not skip the steps below—without these, ORF will not make any difference.
| 1 |
Start the ORF Administration ToolIf you have selected the default installation options, the Administration Tool icon is already on your desktop or it is available under the ORF Fusion 5.3 group of the Start menu. |
| 2 |
Connect to the local installationClick the Connect to button in the Administration Tool window and select the Connect locally option from the dialog displayed, then click Connect button. |
| 3 |
Completing the initial configurationNow you are connected to your ORF installation and the Welcome to ORF dialog is displayed. Follow the instructions in this dialog to complete the installation of ORF. At very least, take the Configuration Wizard. If you decide to skip this for now and go for discovering ORF first, you can always launch it later from the File | Configuration Wizard menu, however. |
| 4 |
Start the ORF Service
Once the initial configuration is complete and the configuration is saved, start the ORF Service either using the ORF Administration Tool or the Services
MMC or from command-line using |
Notes
Filtering Order
By default, ORF is likely to filter emails after other components (e.g., the built-in spam filtering features of Exchange). If you want ORF to filter emails first, please consult our related Knowledge Base article. Note that the priority settings are reset after ORF upgrades , so they have to be restored manually after each upgrade.
Installing on Microsoft® Exchange 2013
Please note that not all ORF features are available on all Microsoft® Exchange 2013 server roles, so you may need to install ORF to multiple servers to use all features available. For more information, please consult our related Knowledge Base article and our Multi-Server Usage Guide.
If you have Microsoft® Exchange 2013 SP 1 installed, a hotfix should be installed first to address a defect affecting ORF functionality.