This document summarizes our recommendations to get the highest performance out of ORF. The intended audience is the system administrator who already knows a bit about ORF (if you are not quite there yet, start with ORF 101).
What do I get?
Following the advice and steps below will give you 98%+ spam catch rate, while maintaining zero or near-zero false positive rate, depending on the aggressiveness of filtering options you choose.
Table of Contents
The Basics
Follow the advice in this section to set up the foundation of ORF properly. The below are the absolute essentials required, so be sure not to skip these.
Get the DNS settings right
Use the default built-in DNS resolver, unless you have a very good reason to use an external DNS server instead. Such reason may be:
- if you are running ORF on multiple servers and you are worried about performance
- if you need to restrict DNS network traffic to the resolver server only
In case either of the above applies, consult the Deployment Guide for requirements for external DNS servers.
Further recommendations:
- Keep DNS timeout low (no more than the default 8 seconds)
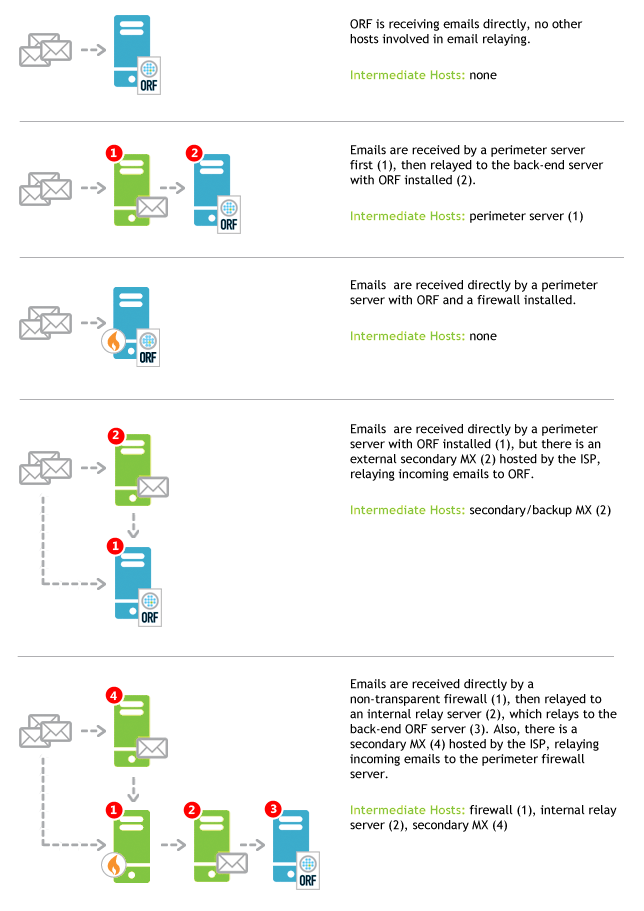
Set up the Intermediate Host List
Click to view examplesThis ORF list contains any intermediate delivery hops between your network perimeter and your ORF server, enabling ORF to discover the actual email source outside your network.
This list must include:
- your secondary MXs (if they forward to the ORF server)
- your front-end servers (e.g. DMZ servers)
- your firewalls
If ORF receives no forwarded email (e.g. from secondary MXs), this list will be empty. Hosts with intranet addresses (e.g. 192.168.*, etc.) are always considered part of this list and are need not to be added.
Be sure to update this list on email delivery configuration changes.
Deploy ORF on the network perimeter
By making ORF the very delivery first component within your network to process emails, you will enjoy the full range of ORF tools and features. Consult the Deployment Guide for the complete list of benefits of the perimeter deployment.
Efficient Spam Filtering
Tests: A Starter Plan
The plethora of email security tools ("tests") in ORF makes it easy to shape ORF to your requirements, but it also takes a bit of a practice to master them.
We recommend that you start out with the test plan below. When you are ready to discover ORF further, start introducing changes gradually and watch the performance.
The plan below offers a good spam catch rate with a very low chance for false positives. The test selection in alphabetical order:
- Attachment Blacklist — Enable only if you wish to filter attachments with ORF.
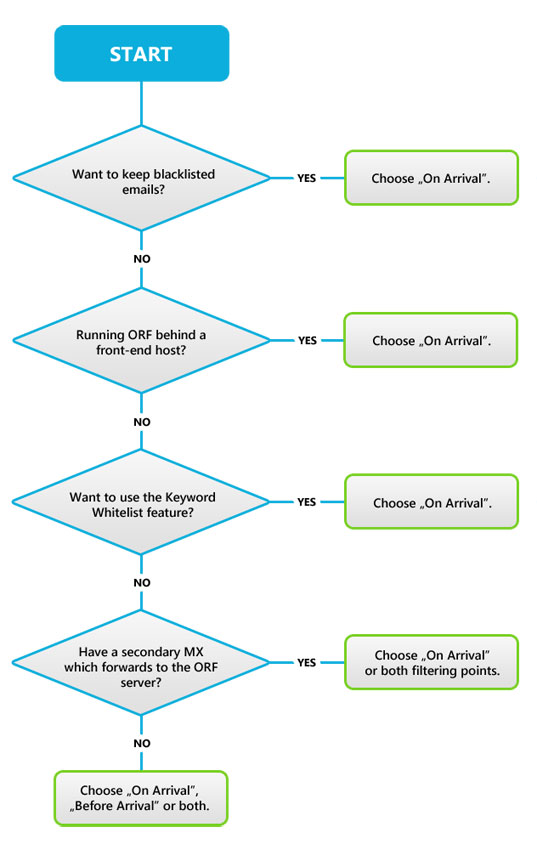
- Authentication Whitelist — Enable at both filtering points.
- Auto Sender Whitelist — Enable at both filtering points, but only if the ORF server handles outbound emails from your network.
- DNS Blacklists — Choose the following: "Barracuda Reputation Block List"; "Spamhaus ZEN".
- DNS Whitelist — Enable at both filtering points.
- HELO Domain Blacklist — With the default rules: blacklisting on malformed domains and when the domain is the same as the recipient domain.
- Reverse DNS Test — With the default rule: Enable the Sender Domain Validation only with "DNS MX or A".
- DMARC Test — With the default settings.
- SURBL Test — Choose the following: "Spamhaus DBL", "SURBL: Combined SURBL List".
If you have already implemented the plan above and are now ready to delve deeper, see the next section.
Tips for higher performance (low risk)
The following tips carry a low risk for false positives.
- Try more DNS Blacklists. Visit our Spam Statistics page for our current recommendations. Be sure not to use more than 3-5 DNS Blacklists at once, though. DNS Blacklists recommended by Vamsoft are listed in our related Knowledge Base article. Make sure your current definition set is up-to-date, i.e., DNS Blacklists which no longer operate (e.g., NJABL) are removed from the active configuration. For detailed instructions, see this article .
- Try more SURBLs. Our SURBL recommendations are available on the same Spam Statistics page. Do not enable any "SURBL:" prefixed SURBLs if you already have the "SURBL: Combined SURBL List" enabled, as all these others are included in the combined list. SURBLs recommended by Vamsoft are listed in our related Knowledge Base article.
- Set up the Honeypot Test. Create a report using the ORF Reporting Tool and check the Top Spammed Recipients section. Look for addresses that never existed in your organization and add these as Honeypot addresses. Find more honeypot tips in this article.
- Enable the DHA Protection Test (if possible in your network setup). This test will help you limit the damage done by Directory Harvest Attacks.
- Enable SPF blacklisting on SoftFail. Find this option under Blacklists / SPF Test, Settings dialog, Blacklist emails on SPF SoftFail.
- Set up the Vamsoft "Self-Spam Agent" or try other techniques to stop "self-spam". Learn more in this article.
- Set up the Vamsoft "Backscatter Protection Agent". Backscatter (or "reverse NDR") attacks occur when a spammer sends large amounts of email in the name of your domain and your email server gets bombed by bounce reports (also called DSNs or NDRs) from legitimate servers. Try the agent we developed against this type of attack.
Tips for higher performance (medium risk)
Using the tips below you can further increase the spam filtering efficiency with the trade-off of a higher chance for false positives.
- Enable the Greylisting test. This test temporarily rejects emails from unknown senders and relies on the assumption that legitimate email servers retry the delivery automatically. This test offers an excellent spam catch rate, but the price to pay is the increased delivery time, typically 5-15 minutes from unknown senders.
- Enable the "Real Reverse DNS Test". Set the Sender IP Reverse Name Validation checkbox on the Blacklists / Reverse DNS Test page. This test will check if there is a host name for the sending IP address, allowing you to blacklist the email from bogus/poorly configured networks.
- Try the Charset Blacklist. This feature can blacklist some of the emails written in non-Latin scripts. Learn more about this feature in the ORF help.
Maintenance DOs and DON'Ts
Find various assorted best practice advices below.
The DOs
- Publish an SPF policy. An SPF policy helps to verify whether a mail server is authorized to send email on behalf of your domain and provides some protection against "backscatter" (that is, when your domain is used in a spam campaign and you get bombed with NDRs for emails you never actually sent). Learn more about SPF at http://www.open-spf.org.
- Publish a DMARC policy. A DMARC policy can help in protecting your users from phishing and email fraud that impersonates your domains. Learn more about DMARC at https://dmarc.org/.
- Give ClamAV a try. Our two-part series on the topic explains how to attach ClamAV to ORF and get an additional layer of virus protection free of charge.
- Always add comments to list items. ORF features several lists, like the Sender Whitelist or the Keyword Blacklist. To begin with, adding comments to items on these lists helps you remember why the item was added in the first place. More importantly, the comment is logged when a hit occurs on a list and this is very handy for troubleshooting. For instance, if your Keyword Blacklist contains some 50 keywords, the logged comment will help you to pick out which one is causing trouble.
- Use the Keyword Whitelist. Add a few of your brand names or business-specific keywords to the Keyword Whitelist. The keywords can be anything that may be present in your legitimate emails, but specific enough not to occur in spam emails.
- Use the Auto Sender Whitelist. This test learns from your outbound email traffic and builds a trusted sender whitelist automatically. This reduces the chance for false positives significantly at practically no administration cost.
- Learn regular expressions. "Regexes" come in handy when you need more than simple wildcards. For instance, a simple regex like .*\d{15,}.*@.* can describe a complex rule like "email addresses which contain a sequence of 15 or more digits in the mailbox name". Regular expressions are widely available in ORF, but you can also use them elsewhere, even in Microsoft® Word.
- Check the ASWL IP Exceptions (IIS SMTP Service only). If you are running ORF on a front-end IIS SMTP Server, make sure the back-end server IP is added to the IP-Based Collection Exceptions of the Auto Sender Whitelist (Whitelists / Auto Sender Whitelist, Settings dialog, Collection Exceptions tab).
- Review DNSBL and SURBL usage conditions. Before enabling a DNS Blacklist or SURBL, make sure to read their usage conditions to see if you qualify for free use and consider donating to community-financed services.
The DON'Ts
- Do not rely on the Keyword Blacklist to stop spam. Hundreds of spam campaigns are launched daily, so crafting keyword expressions against them will only rob you blind of your time. It also takes a great deal of practice to write proper expressions that will catch spam without harming legitimate emails. We recommend that you use the Keyword Blacklist only to stop offensive words.
- Do not rely on the IP Blacklist or the Sender Blacklist to stop spam. Spam source IP addresses are moving targets and there are just too many of them, so the IP Blacklist will not be of any help against spam. The Sender Blacklist is also useless for this purpose, because in all but a few cases the sender address is forged. Use these lists to ban otherwise legitimate email sources, e.g. newsletters you cannot unsubscribe from, etc.
- Do not whitelist your own domain. Adding your own domain to the Sender Whitelist is a surefire way to get hammered by spam sent in your name, a common trick employed by spammers.
- Do not whitelist Hotmail, Gmail, etc. When you add *@hotmail.com, *@gmail.com, *@yahoo.com, etc. to the Sender Whitelist, you kick the doors wide open for scammers and like. Trust whitelisting to the Auto Sender Whitelist.
- Do not use Tarpit Delay, unless you are ready to pay the price. The very goal of this feature is to slow down the communication during email transmission, which allows you to fight back the spammers a little. However, it also decreases the responsiveness of your server, which may not play well with legitimate emails during peak times.
Still not getting what you expect of ORF? Talk with our Customer Service, we are happy to help you with fine-tuning ORF.